Wednesday, March 2, 2022

Trying out Beef Samosas

Hey! I found a blog where there's NOT a thousand words preceding the recipe. I'm going to try these for dinner in the air fryer:

https://www.lifesambrosia.com/beef-samosas-recipe/

I'm REALLY trying to get our meals under control. Today was grocery shopping day. Store #1(Aldi), I dropped a modest $50 or so on a few things that we needed - milk, bread, etc.

Then, I went to store #2 for things that they don't have at Aldi, namely our toilet paper, toothpaste, and vitamins. $93. It was insane. It barely filled 3 bags. 

Inflation sucks. 


I started with sauteing the spices to bring out the flavor. This is what you're supposed to do, right?
It was at this point that Kid #2 (believed to be the world's pickiest eater, until the birth of Kid #3) came upstairs and started gagging.


Honestly, the spice mix reminds me of Christmas. My grandparents were living in Indonesia in the 1940s, and developed a taste for Asian spice blends. This kind of stuff was our Christmas Eve dinner growing up. Along with Egg Rolls, and a Dutch eggnog called Advocaat. 


It turns out that my freezer did NOT have frozen peas and carrots like I thought it did, so I diced up some carrots and tossed them into the spices to cook a bit while I diced the onion.


Then, I threw in the beef, and browned it in the same pan with everything else. We raise our own beef, and it's an incredibly low-fat breed, so there is generally no fat to drain. I also dumped in the frozen/thawed peas and let everything cook for a while. 

Note: I did not season this at all at this time. This will come to haunt me later.


As I am a big cheater, I used good old Pepperidge Farm frozen puff pastry sheets. I cut each sheet in the box into 9 squares, and then rolled them flatter. I have a bad history with turnovers exploding all over the kitchen, so I prefer the puff pastry to be extra thin. Rolling it out also makes it easier to fold over the filling.
 

Once I had all of my samosas filled and sealed (about 1/4 of filling in each one), I sprayed them with olive oil. I put 4 in my air fryer, and the rest in the convection oven, both at 400F.


I think I prefer the oven for large batches. My air fryer is not very big, and it would take for.ever to do all 18 of them.  The air fryer will be great for reheating, though!


The verdict: I FORGOT TO SALT IT. Totally forgot to salt, pepper, and ginger the ground beef. This was apparent as soon as I took a bite. 

So sad :(

Kid #1 and Husband both solved this problem by dousing it in ketchup. Kid #2 was not a fan (he said) but he did manage to eat an entire samosa, so it couldn't have been THAT bad.

Then there is kid #3. I think she had one bite of the ground beef, and cried about everything else. She's a challenge.

Next time I make these, I'll remember to season the beef.

Monday, February 28, 2022

Get To The Point Recipe - Quick Cinnamon Rolls

 Ok, I'm desperately trying to meal plan, and actually stick to it (Thanks, out of control inflation!).

Here's today's breakfast:

https://www.thekitchenmagpie.com/quickie-homemade-cinnamon-rolls/

If you get through all the stories, and ads, and whatnot on her page, you find the recipe (this irritates the bejeezus out of me).

Essentially, here it is:

Preheat to 400F

Mix 2 cups of flour, 2 Tbsp sugar, and 4 tsp baking powder.

Cut in a half stick of butter.

Add a cup of milk and mix it into a ball. 

Turn out onto a "lightly" floured surface (more on that later) and roll out to 12" x 8".

Behind the scenes, mix a packed cup of brown sugar, 1/3 cup of softened (really soft) butter, and a Tbsp of cinnamon.

Spread this on the dough. Sprinkle with raisins (or NOT, definitely not, here) and roll it up 

Cut it into 12 pieces, pop the pieces into muffin cups, and bake until golden and bubbly (20 minutes if you don't want to rely on your judgment).


Simple enough, right?

So, here's where I tell you a story. 

I HATE when you have to scroll through the equivalent of 5 pages of ads just to find the recipe you want. As such, I'm going to start putting all the recipes at the TOP of my blog, and then tell you the story and show you the pictures afterward. 

Since no one reads my blog, and it's not monetized, I got nothin' to lose here.


Today's little story starts yesterday, actually. 
Yesterday, we had to go out to dinner with my husband's family to celebrate a bunch of February birthdays. It was nice to go out, but the food was meh, and if I'm being honest, spending $100 on ONE MEAL for our family of 5 was painful. The pandemic recession and inflation is killing me.  

Hence my desire to REALLY TRY to be better at meal planning. 

I wasn't in the best of moods upon arriving late to the party (we are ALWAYS late, no matter how hard I try - this time, husband and kid #1 were in the woods tapping Maple trees, and didn't hear my repeated phone calls that it was time to come back). We were only 12 minutes late, which for this group is practically on time, but unfortunately, that meant that we got the crappy end of the giant table, and I was forced to only interact with my own children.

Before you jump on me for not wanting to deal with my kids, they are blessings, blah blah blah, I am with my children ALL THE TIME. They are homeschooled. I spend quality time with them NON. STOP. 

We spent the time waiting for our food playing tic tac toe, and making a list of things we needed to do when we got home. 

Item one: Prep Cinnamon Rolls for Breakfast.


Yeaaaaaahhhh. That didn't happen last night. 
But the kids were jazzed about cinnamon rolls, and I had to deliver. 
This set me on my path to find a "quick" cinnamon roll recipe, i.e. one that doesn't require yeast and hours of rising time. 

Enter The Kitchen Magpie. 
Link again in case you missed it: https://www.thekitchenmagpie.com/quickie-homemade-cinnamon-rolls/

This was a disaster to make this morning.
Let me show you. 

It started out ok. I had a clearish place on the kitchen island (aka The Island of Doom). I had all the ingredients. There was a clean mixing bowl. The cheese grater was clean. 

The cheese grater will make sense later.

I mixed my dry ingredients, all was well.
Since I'm lazy, I would MUCH rather just grate a half stick of butter into my dry ingredients than attempt to find my pastry blender and deal with that. 
Seriously. Grate your cold butter. It works so much better.


Anyhow, things were looking good.

I added the milk, and that's when things started to get iffy. I was left with a REALLY wet dough that I knew would be a nightmare to try to roll, pat, or otherwise turn into a rectangle.

I did the logical thing which was to add a touch more flour and try to dry it out before I turned it out onto my parchment paper.
That I forgot to flour.
Until it was wayyyy too late.

It was at this point at which I decided I was screwed.

But I soldiered on and added the filling, thinking it wouldn't be too bad to scrape it off the parchment and roll it.

HAAAAAAAAA!!!!!


It's blurry because my preschooler was having her first tantrum of the day because I wouldn't let her help.

This was worthy of Nailed It! It was a absolute disaster. 
My attitude probably didn't help.

Seriously, y'all. Flour the parchment paper.

It was so bad. I gave up on rolls, and just made globs. Beautiful cinnamon globs. In Halloween muffin papers. Because that was what was on top of my cupcake liner stack.


While they were baking (20 minutes, btw), I made a quick cream cheese icing, instead of the icing in the recipe. I use softened cream cheese (there was never a shortage of it
here!), a dash of real vanilla extract (Beanilla.com is the best), and enough powdered sugar to make it the consistency I wanted. 


I neglected to get a good picture of them done. You know, the pretty picture that makes you want to make the recipe. Instead I got a picture of the immense amount of melted butter that I will be digging out of the muffin tin.


Overall, these were actually really good. They ended up like a cinnamon monkey bread, essentially. I'm not usually a fan of quick breads over yeast breads, but time dictated that I make a quick bread this morning. 

3/3 kids liked it and ate seconds.
That's a win around here.


Thursday, December 1, 2016

DIY Lego Advent Calendar Tree Shelf

 I should really put more stuff on this blog.
What can I say?
I'm lazy.

Regardless, it is December 1st, and my kids got some new Advent calendars from their Oma.
Lego Advent calendars, to be exact.

At 3 and 5, my kids are just too big for Duplo, and still messy enough that Legos are NEVER picked up. My 3 year actually dumps buckets of them out and walks across them for fun. I have witnesses. It's nuts.

In my search for a neat way to organize/display their legos, I found some cool floating shelves that people just glue base plates onto. Sounds great, right?!?!

Off to Amazon I go . . .

I ended up ordering some 16 (dot) by 32 (dot) baseplates for super cheap, thinking that I was going to just take some 2 x 4's, cut them in half (or have my handy husband cut them in half, since the table saw terrifies me), paint them, glue on baseplate pieces, and hang them on our walls (somewhere). I always get these neat ideas for storage for the kids, and then it ends up not fitting on our walls. The hazards of a small   a tiny  an energy efficient house.

Well, anyway, it's December 1st, and the Advent season is upon us. The boys opened their calendars and put together their little Lego kits, and then put them BACK in the Lego Advent calendar, as there was no place to put them. Enter in my bright idea: How about an Advent Lego shelf?

Why not?!

Off to the garage I go, after a quick call to the handy husband to see if there were any pieces of wood that were off limits - he's building a new hunting palace blind.

I was in luck!

After literally minutes of planning, I was armed with a scribble piece of paper with measurements, and my trusty 20+ year old chop saw. Luckily I got my pieces cut quickly, because the 5 pound dog decided that my carefully made plans looked like a good placemat and got dog food and drool all over them.


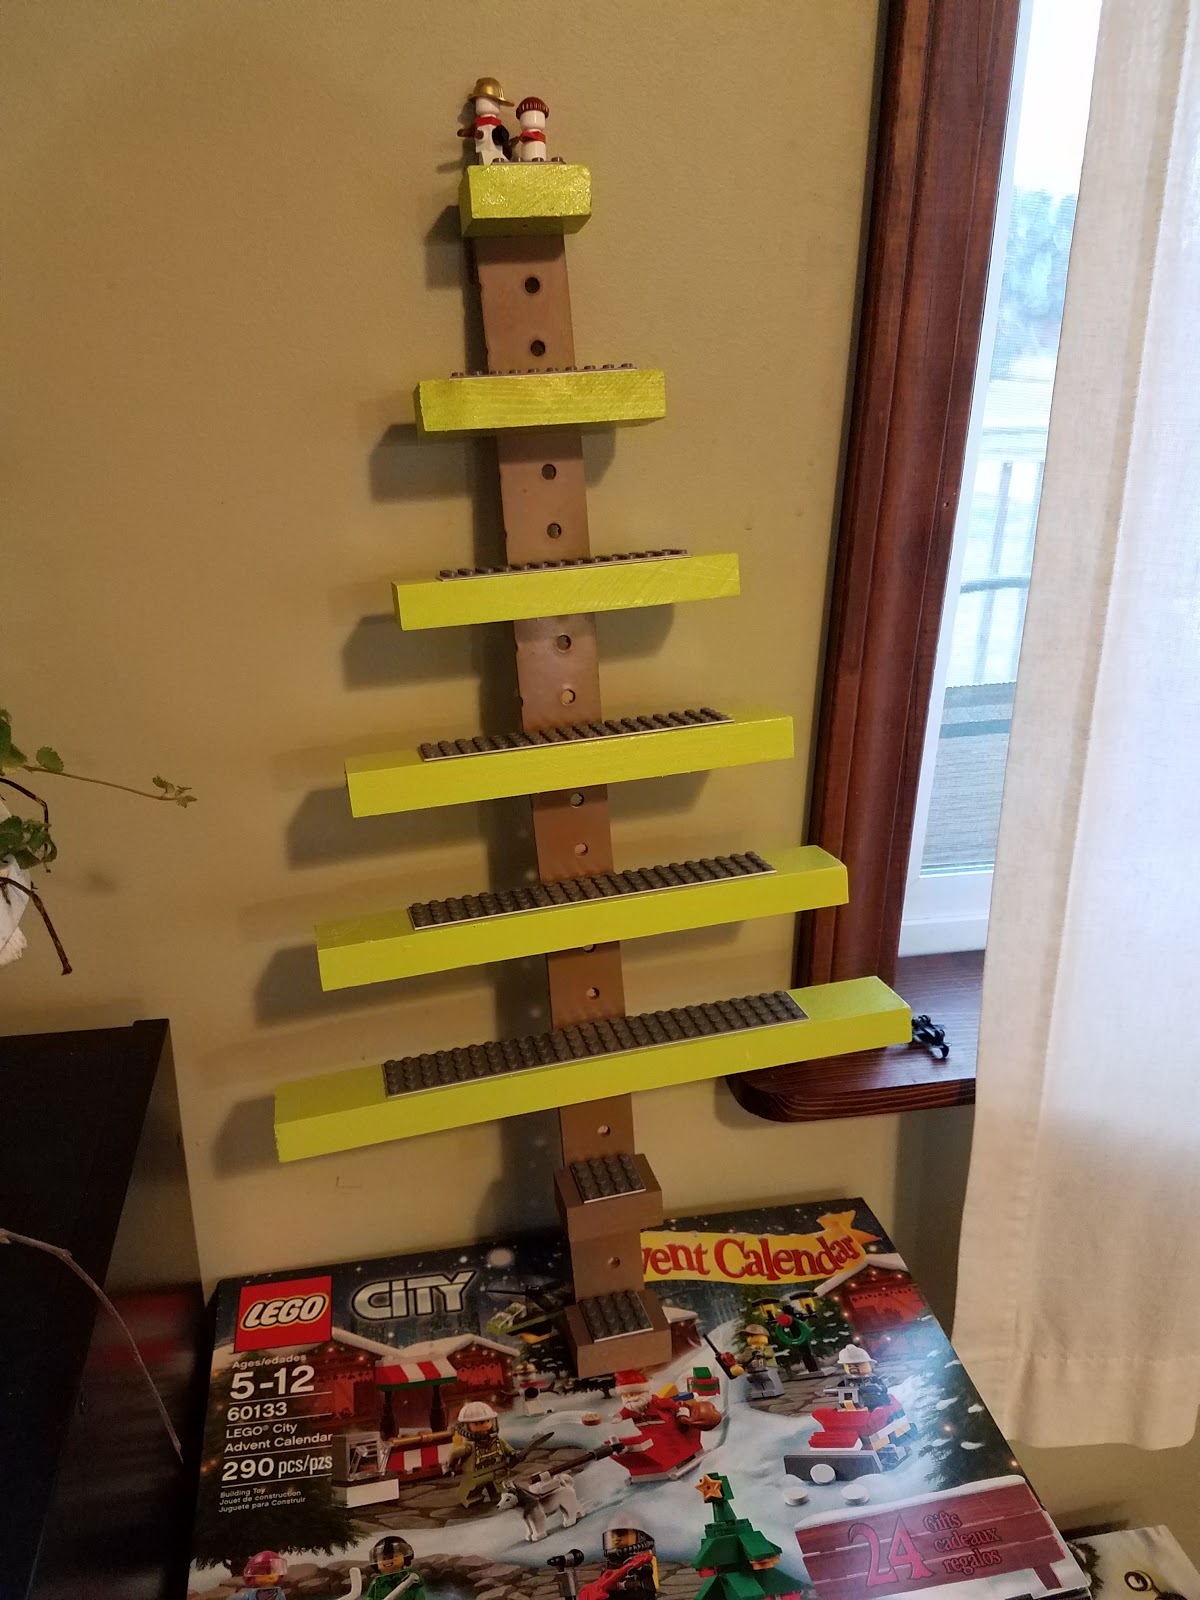
I made two shelves, since I have two boys, and sharing is always dicey.

For one shelf, you need:
Wood - I used a 2x4 cut in half lengthwise that I found in the garage, and a random piece of pegboard that looked like the right width.

Superglue - I used Gorilla Brand because that's what Santa brought me in my stocking last year

Lego Baseplate - I used this

Spray Paint - I used Rustoleum 2x in Nutmeg and Key Lime, leftover from summer projects

Screws - Mine were 3/4" #8 wood screws that I inherited from my grandfather

Drill/Bits

Cut list
From the 2x2 (2x4 ripped in half):
3 pieces 2"1 piece 4"

1 piece 6"
1 piece 8"
1 piece 10"
1 piece 12"

From pegboard, or whatever piece of approximately 1/4" thick wood you have laying around:
1 piece 2" x 22" (Make it whatever size you want. This is just what I did, mainly because it was already cut from the hunting palace project.)

Assembly:

Take 2 of the 2" pieces of  2 x 2 and the 2"x 22" piece of whatever you are using (plywood, pegboard, whatever) and spray paint them brown.

Spray the rest of the pieces green.

Wait until everything is dry.
Seriously.
Wait.
Walk away for a day.
Don't mess with it.
Just wait.
(Guess what I'm not good at.)

While that's drying, cut your baseplates. I probably should have bought green baseplates, but these grey ones were SUPER cheap, and I didn't come up with the tree shelf idea until about 2 minutes before USPS showed up with them, so there you go.

Initially, I cut my plate into 4 dot x 32 dot strips. To do this, I used a utility knife and a carpenter's square. It was easy. First score the plate, then bend it to break it along the score line. I only needed one pass with the utility knife. I found scoring the back was easier that scoring the front, although when bending and snapping (he he he) I managed to get a blood blister - so random.


Once you have the strips, you can cut the lengths. I kinda guesstimated what I would need, and what I could get with the least waste. (all measurements are in DOTS)
Strip 1  - 26 x 4  and 4 x 4 (2x4 as waste)
Strip 2 - 22 x 4 and 10 x 4 (no waste)
Strip 3 - 18 x 4 and 14 x 4 (no waste)
Strip 4 - 4 x 4 and 4 x 4 (24 x 4 waste - save it for something else)
If you want your shelves longer, adjust as you see fit.

Once the paint was FINALLY dry(ish) I glued the plates to each shelf.

If it looks like I have a lot of pieces, it's because I'm making two sets of shelves.
I lined my pieces up like a tree, drilled some pilot holes, and then fastened with the wood screws (this is where the pegboard shines, because I didn't have to drill holes OR measure - double SCORE). My shelves are about 2 1/4" apart.
I kind of wish this had been cut straight, but oh, well.

Ta Da!

I thought about adding a star to the top, but I think I'm cool with how they turned out.

Truth be told, these will likely never be hung, instead they will sit on top of the Ikea Trofast in my living room where my kids can mess with them. If you want to hang them, go for it!

Monday, July 6, 2015

Summer Sewing, Volume I

Ugh.

Facebook is a dangerous place.
One of my friends posted this seemingly innocent little project involving clear vinyl, zippers and strips of leftover fabric.

Yeah, I have all of those things.

http://negligentstylee.blogspot.com/2014/01/tutorial-scrappy-vinyl-pouches.html

Then I saw the beautiful rainbow of little vinyl pouches, and I was screwed.

So I needed to make them.
From ALLLLLLLLLL the colors.

I need them.
To be organized.
I can't be organized without a billion of these cute little vinyl bags.

The problem arose when I actually started trying to make one from the tutorial. It involved too much brain power.
I have a Bachelor's in Biology, I minored in Chemistry. Metric shouldn't be that big of a problem for me, but I have two small children, and when I found this project, we had had the stomach flu running through our house for two weeks. My brain was done.

I can't metric today.

My blondness = your gain. Here I present my own twist on this project, which really isn't all that different, except it's in Imperial measurement the entire time. (Please go read the original, she has some great hints on working with the vinyl).

Materials:
Scrap of cotton quilter's fabric (I used 1/8 yd, but you really only need about a 4" x 20" piece)
Zipper (7" or longer - you can cut down a longer zipper, that's what I did)
Clear vinyl (about 1/4 yd will get you several pouches - I think mine was about 12 gauge, but since I found it in my vinyl box in the garage from 10 years ago, it's really anyone's guess as to what it is)
Thread
Zipper Foot
Scotch Tape
KAM Snap and pliers (entirely optional)


Procedure:

Gather up your supplies. If you are using a zipper that is longer than 7", you'll need to cut it down. I'm using the aqua zipper in this picture, and cutting it down to the size of the beige one.

For my fabric, I cut one piece that was 4" wide by about 9", a piece of vinyl that is 9" x 12", a piece of fabric for the strap that was 3" x 12" and a small scrap to cover up where I used a pen on the zipper.


The mark that goes all the way across is where I needed to put a bar tack to shorten the zipper the shorter line is where I need to cut the zipper. I was a little heavy handed on the ink. Whoops.


Oh look, I found all my 7" zippers after I got the longer one trimmed down.
Figures.

So, take both of the strips of fabric that you've cut and fold them in half. Press. Fold the raw edges in to the center and press again. This will encase the raw edges.

On the narrower piece, topstitch on both edges to make the strap. I didn't get a picture of this. Whoops


If you were heavy handed on the ink, you'll want to cover up the ink by sewing a tiny piece of fabric on the end so the ink is covered up. Don't bother if you didn't hack down a longer zipper.

Here's the end result, covering up the ink spot.

Pin the folded edge of the fabric on the lower side of the zipper, break out your zipper foot, and top stitch the fabric in place.

Ta DA! Trim the fabric along the length of the zipper.

Pin the vinyl in between the pressed edges of the fabric and topstitch along the edge.


Roll the right side of vinyl around and make it flush with the raw edge of the zipper. I use binder clips to pin it to avoid pin holes.


To keep the machine from eating the vinyl, put some tape on the bottom of your zipper foot, and the throat plate of the machine.


There's tape, you just can't see it.

Stitch up one short edge of the pouch. I started with the edge opposite the zipper pull when closed.

Using the binder clip, put the handle in place on the edge of the zipper. ***Leave the zipper open a bit so you can get it open later. Trust me.

Stitch up the other short side and trim the seams down.

Turn right side out.

Add snaps if you feel like it. The purpose of this is explained in the original tutorial. I kind of like having the option.


Tuesday, April 14, 2015

The Fabric Ninja Protector

Sometimes, I need to admit that I can't do everything myself.

I can lay tile, I can keep bees, I can cook, but I can't create a pattern for something that I've never seen.

Thankfully patterns can be procured by PDF :)

Armed with my trusty $50 laser printer, I set out to create a slipcover for my friend's Kinderpack. We had had a friendly "Kindervention" online and convinced her that she was becoming a KP hoarder. As a result she sold her Dinomite, with the promise of a Dino slipcover. This occurred at about the same time that the lovely Alice from FabricNinja.com approached me about reviewing her pattern for this blog (which has become very KP centered lately).  I'm not going to lie. I HATED writing book reviews in high school, and managed to talk my way out of the dreaded ATL classes at Michigan State (Go Green!); having a blog is really an odd outcome for someone with my aversion to writing.

Anywho. Alice offered me the pattern to review, I needed a standard size slipcover pattern, she's also an MSU grad, so how could I say no?

So, without further ado, I bring you my review of The Fabric Ninja's Ninja Protector.

This pattern is available for $7, payable by PayPal, and arrives to you by email. It is in PDF form, and is 18 pages long. It's ok, nature nerds and tree huggers*, you don't have to print it all! You need to print at least 5 pages, which are where the actual patterns are located. The remaining 13 pages are very detailed instructions on how to print the pattern, how to cut your fabric, and how to assemble your carrier. For those of you who have never used a PDF pattern, it's very important that you follow the printing instructions. If you don't, your standard slipcover becomes a doll carrier slipcover.

The pattern prints out on 5 pages, and contains 3 pieces: the headrest, the sides and the center. The headrest is printed on one page, the sides are made up of two pieces, as is the center. Make sure you have some of your own limited edition, one of a kind tape so that you can hook the pieces together prior to cutting out your fabric. There are convenient little crosshairs that you line up, and voila, two pieces become one.

This pattern requires about 1/2 a yard of fabric for each side of the slipcover. There are layouts included in the instructions for maximizing your fabric. If you are mixing fabrics on each side, you can use a fat quarter. Alice has included a very detailed supply list which gives different options for closing the headrest pocket and attaching the cover to your carrier.

Stitching the cover is easy, the pieces line up well. I had a moment of sheer panic at the size of cover, as I've never seen a standard KP and was CERTAIN that it wasn't going to fit. It looked so tiny! Toddler KP's must be massive compared to the standards. Included in the instructions are ideas on finishing the seams. Since we are getting ready to renovate and move, my serger is packed up. I used the handy dandy finishing stitch on my machine instead. I also took the suggestion to pink the inside of the headrest seam to finish and notch in one step. (BRIILLIANT!)

The size of the pieces seriously concerned me. Here are the pieces compared to my homemade toddler cover pattern.


Once the pieces were all assembled, I topstitched everything. I don't know what it is about topstitching, but I like it. I decided not to put in the optional elastic along the hem, and did a plain hem instead.  On the headrest, I put in the snaps to close the pocket, and then got creative and did something a little different on the snaps to connect the carrier to the cover. It seemed like a good theory, but in practice, it made the cover pull oddly. That's why you don't ad lib. If you undo the snap, it stops pulling and lays nice. Live and learn.

Once I gave everything a good pressing, I shipped it 1200 miles to a waiting carrier. This is the result:


Honestly, I am thrilled with the results. This cover looks better than I could have possibly imagined.  Other than the wonky snaps, it's PERFECT!

Here's a quick summary:

Pro's:

VERY affordable
  • At $7, this is a steal. It's well worth paying the equivalent of a McDonald's breakfast to avoid the headache of fitting a pattern. Trust me. Totally. Worth it.
Easy to Print
  • I love the instant gratification of PDF patterns, and I don't need to carefully refold it. I can toss it and print another one. But I won't, because that would kill trees ;)

Detailed Directions
  • The instructions are easy to follow and explain everything that you need to do from how to print the pattern to how to top stitch your strap openings.

Customizable Options
  • When you order your pattern, you can choose from 1 cm (what I chose) or 1/2 inch seam allowances.
  • The different options for the headrest closure are listed.

Fits B-E-A-Utifly
  • Just look at the pictures!


Con's:

Too Detailed
  • If you sew a lot, you might get bogged down in the instructions as they are really detailed.

Snap Issue
  • This isn't really the pattern's fault. Since Kinderpacks are handmade, there is a little variation in the headrest snap placement. This is no problem if you are making it for your own KP. If you are sending it to the other side of the country, be aware that the snaps might be off a little and it might pull funny.

Short Hem
  • I think the hem allowance could be a little bigger to better accommodate the elastic if you choose to use it.

Too Many Closure Options
  • I'll admit that I got a little lost while I was trying to decipher what type of snap I needed to use and where to put it. There were too many choices and I got lost.

The Bottom Line:

This pattern rocks. If you want to make your own slipcover, buy it. Do it. Why are you waiting? Having made my own pattern for my toddler KP, I know that it can be really difficult to get something that fits really well. Save yourself the aggravation and get the pattern. Alice also has a curved drool pad pattern available for a buck that is a heck of a lot easier to sew than my overly complicated version.

The pattern is available at FabricNinja.com, or Facebook.com/thefabricninja


*I'm personally a tree hugger, but many of my friends prefer to be called nature nerds.


Disclaimer: I got the pattern for free for evaluation purposes.


Friday, March 20, 2015

An Ode to a Seam Ripper

Your point is sharp.
My mistakes, you fix.
Sometimes I use you just for kicks.

Though I have many,
You're never near.
I can't find you when I need you, 
I fear.

And so I buy yet another
from internet or fabric store.
And I when I do, I find you.
Hiding in the junk drawer.